The Mamiya 645 vs. the Contax 645 | Mamiya 645AF Sample Photos Using Kodak Portra on a Cross Country Road Trip

(By using the affiliate links and/or codes in this blog post it supports Myles Katherine Photography. We may get a small kick back by you doing so.)

Ugh, I miss my Mamiya 645AF. Over the years I’ve learned to never sell the gear that I love because I always end up regretting it. Yes, I technically upgraded from the Mamiya 645AF to the Contax 645, but there is still something so special to me about the photos I took with the Mamiya 645AF while I had it. Maybe it’s because it was my first professional medium format camera or maybe it’s because something about the images just felt more “me” than my Contax 645. Don’t get me wrong, the Contax 645 is worth every penny and takes incredible photos. You can check out some sample photos I’ve taken with it here. But, because of it’s high price tag, I feel the need to be extra cautious with it when I’m traveling and shooting. In many cases, I just leave it at home because it seems like too much of a risk to be lugging it around haphazardly. With the Mamiya 645, I didn’t overthink, I just brought it with me and didn’t worry as much about the cost if something happened to it.

While I definitely notice a difference in sharpness and quality when it comes to comparing the Mamiya 645AF and the Contax 645, I still have an affinity for the dreamy and playful vibe I got with the Mamiya. The Contax 645 is really geared towards professional photographers and high-end luxury photography. It’s super, ridiculously sharp and quite a bit more reliable than the Mamiya 645. I always had issues with focusing when it came to the Mamiya. The Contax 645 is a workhorse of a camera and I’m never disappointed with the images. You can read my full review of the Contax 645 here, or check out my YouTube video featuring the Contax here! But for anyone just starting out with medium format photography, you will not be disappointed with the Mamiya 645AF. There are so many images I took with it that I still cherish to this day.

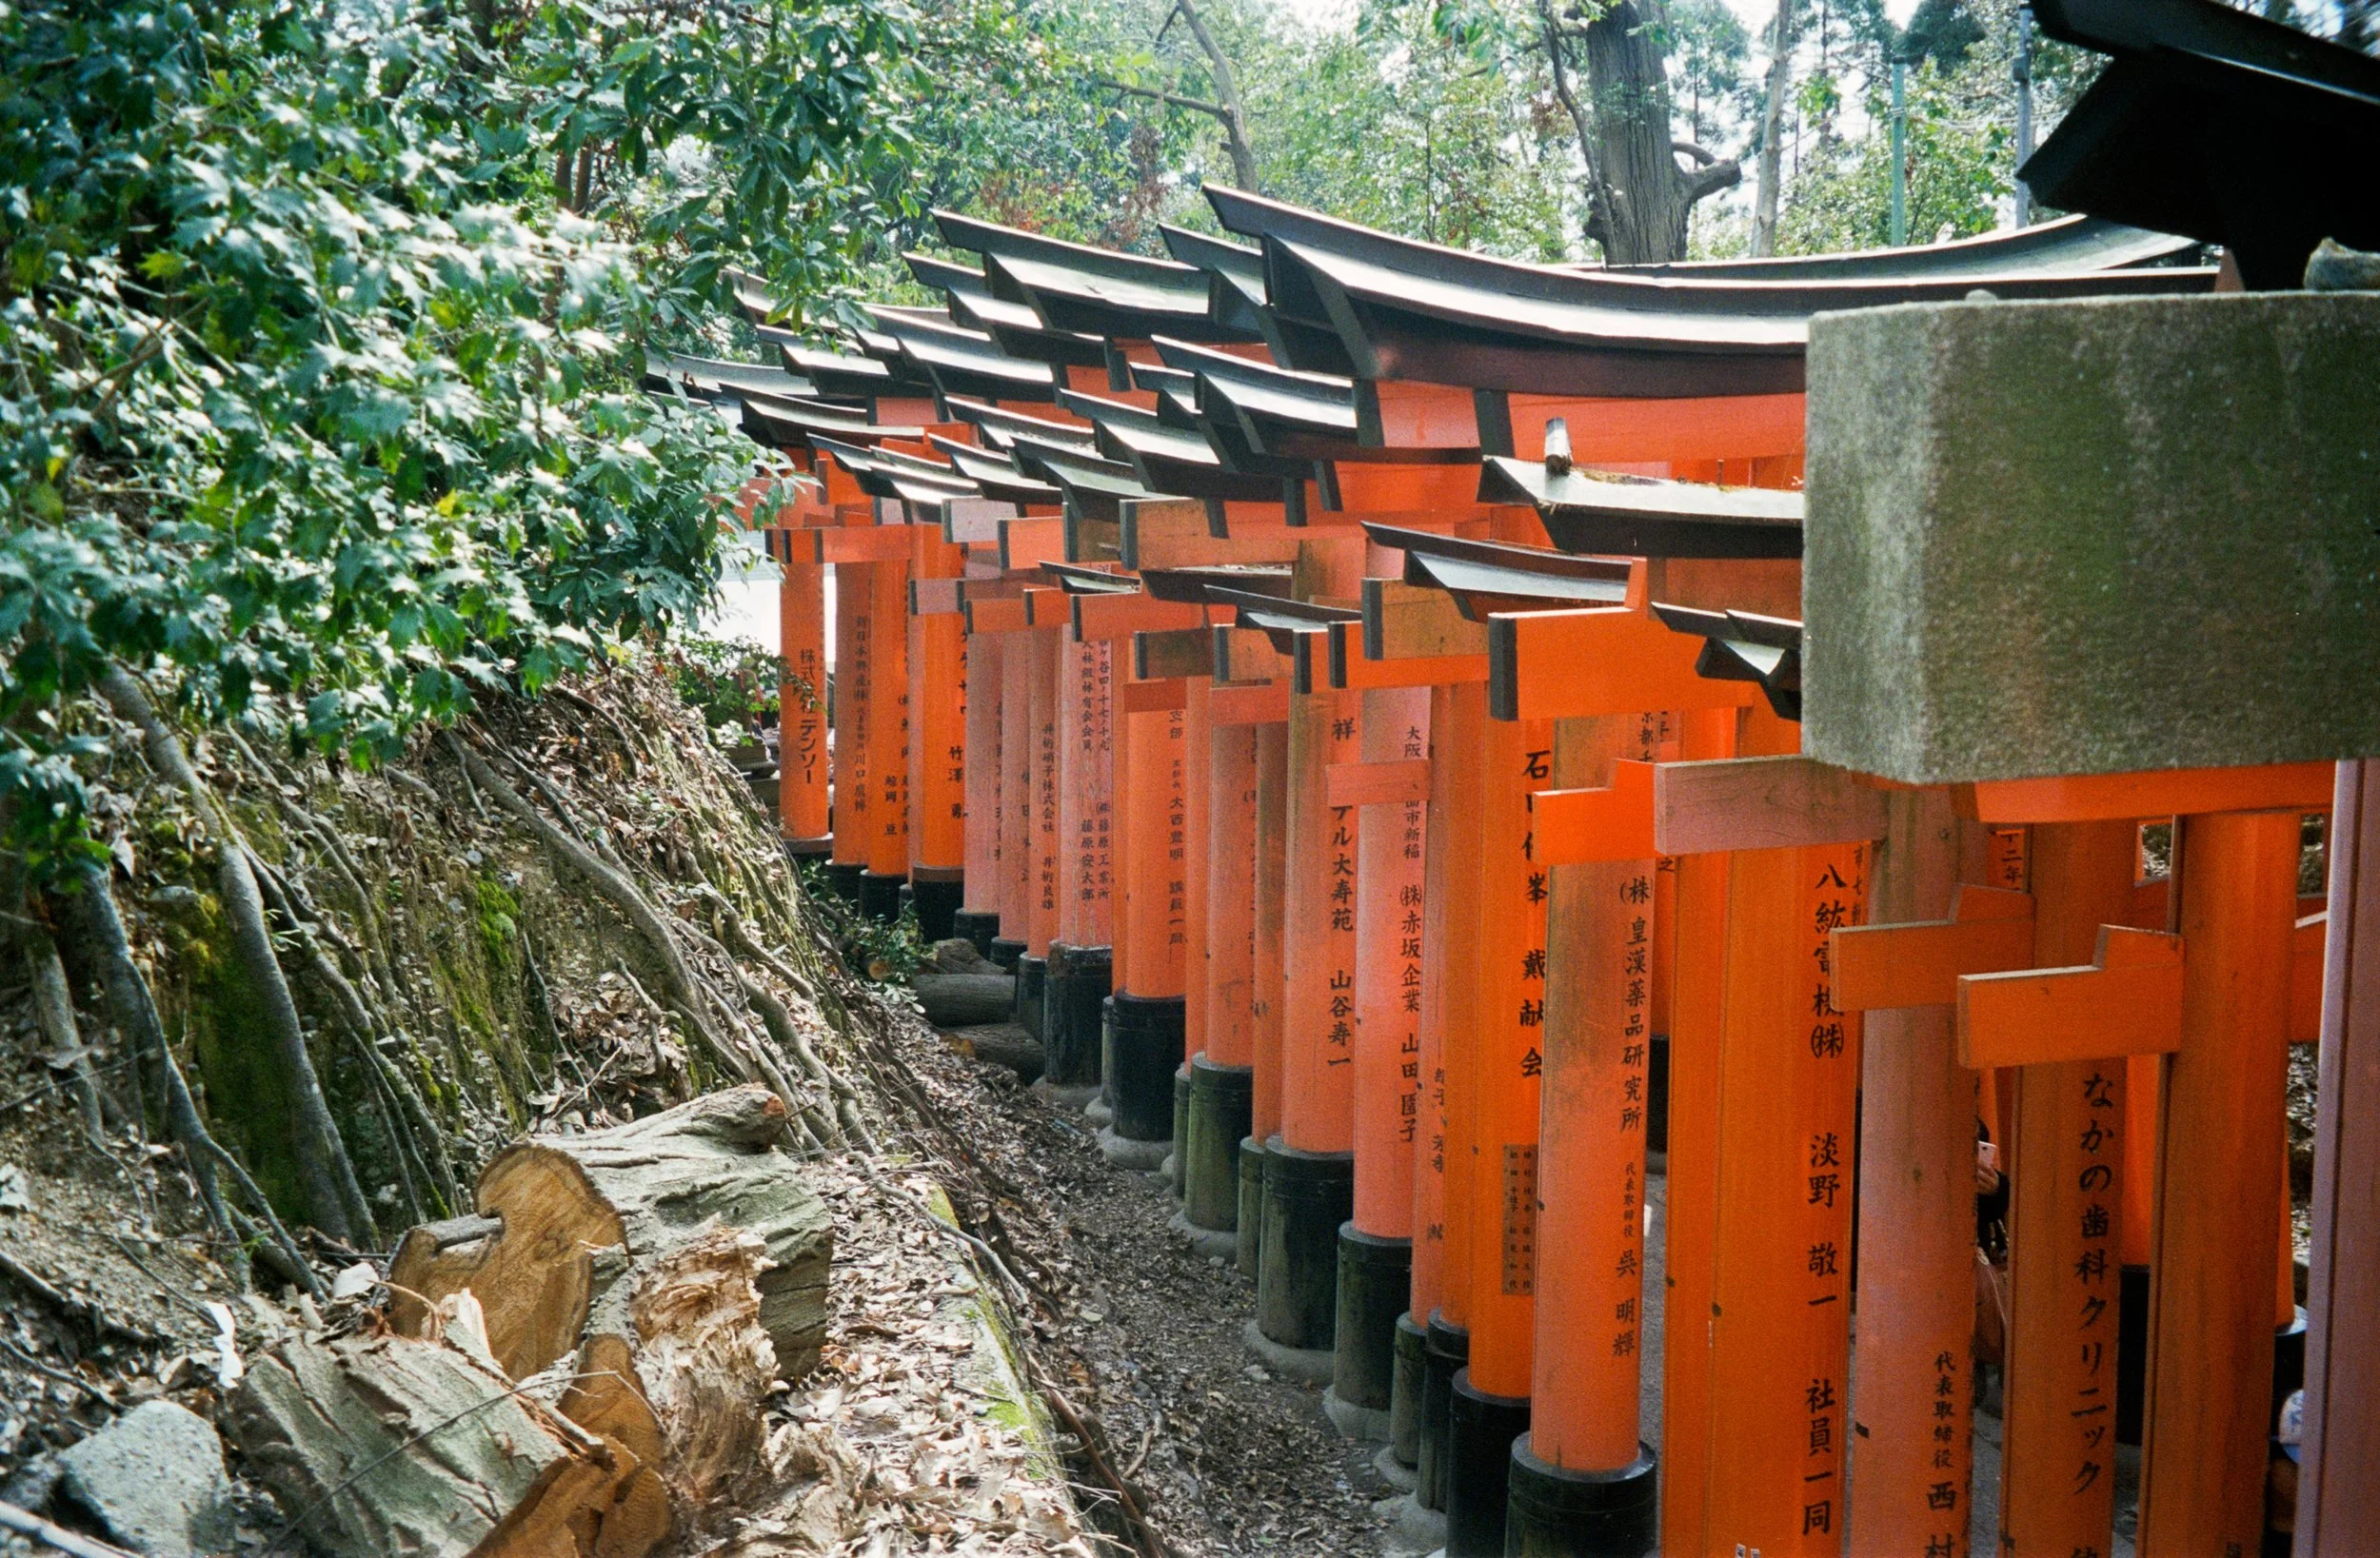
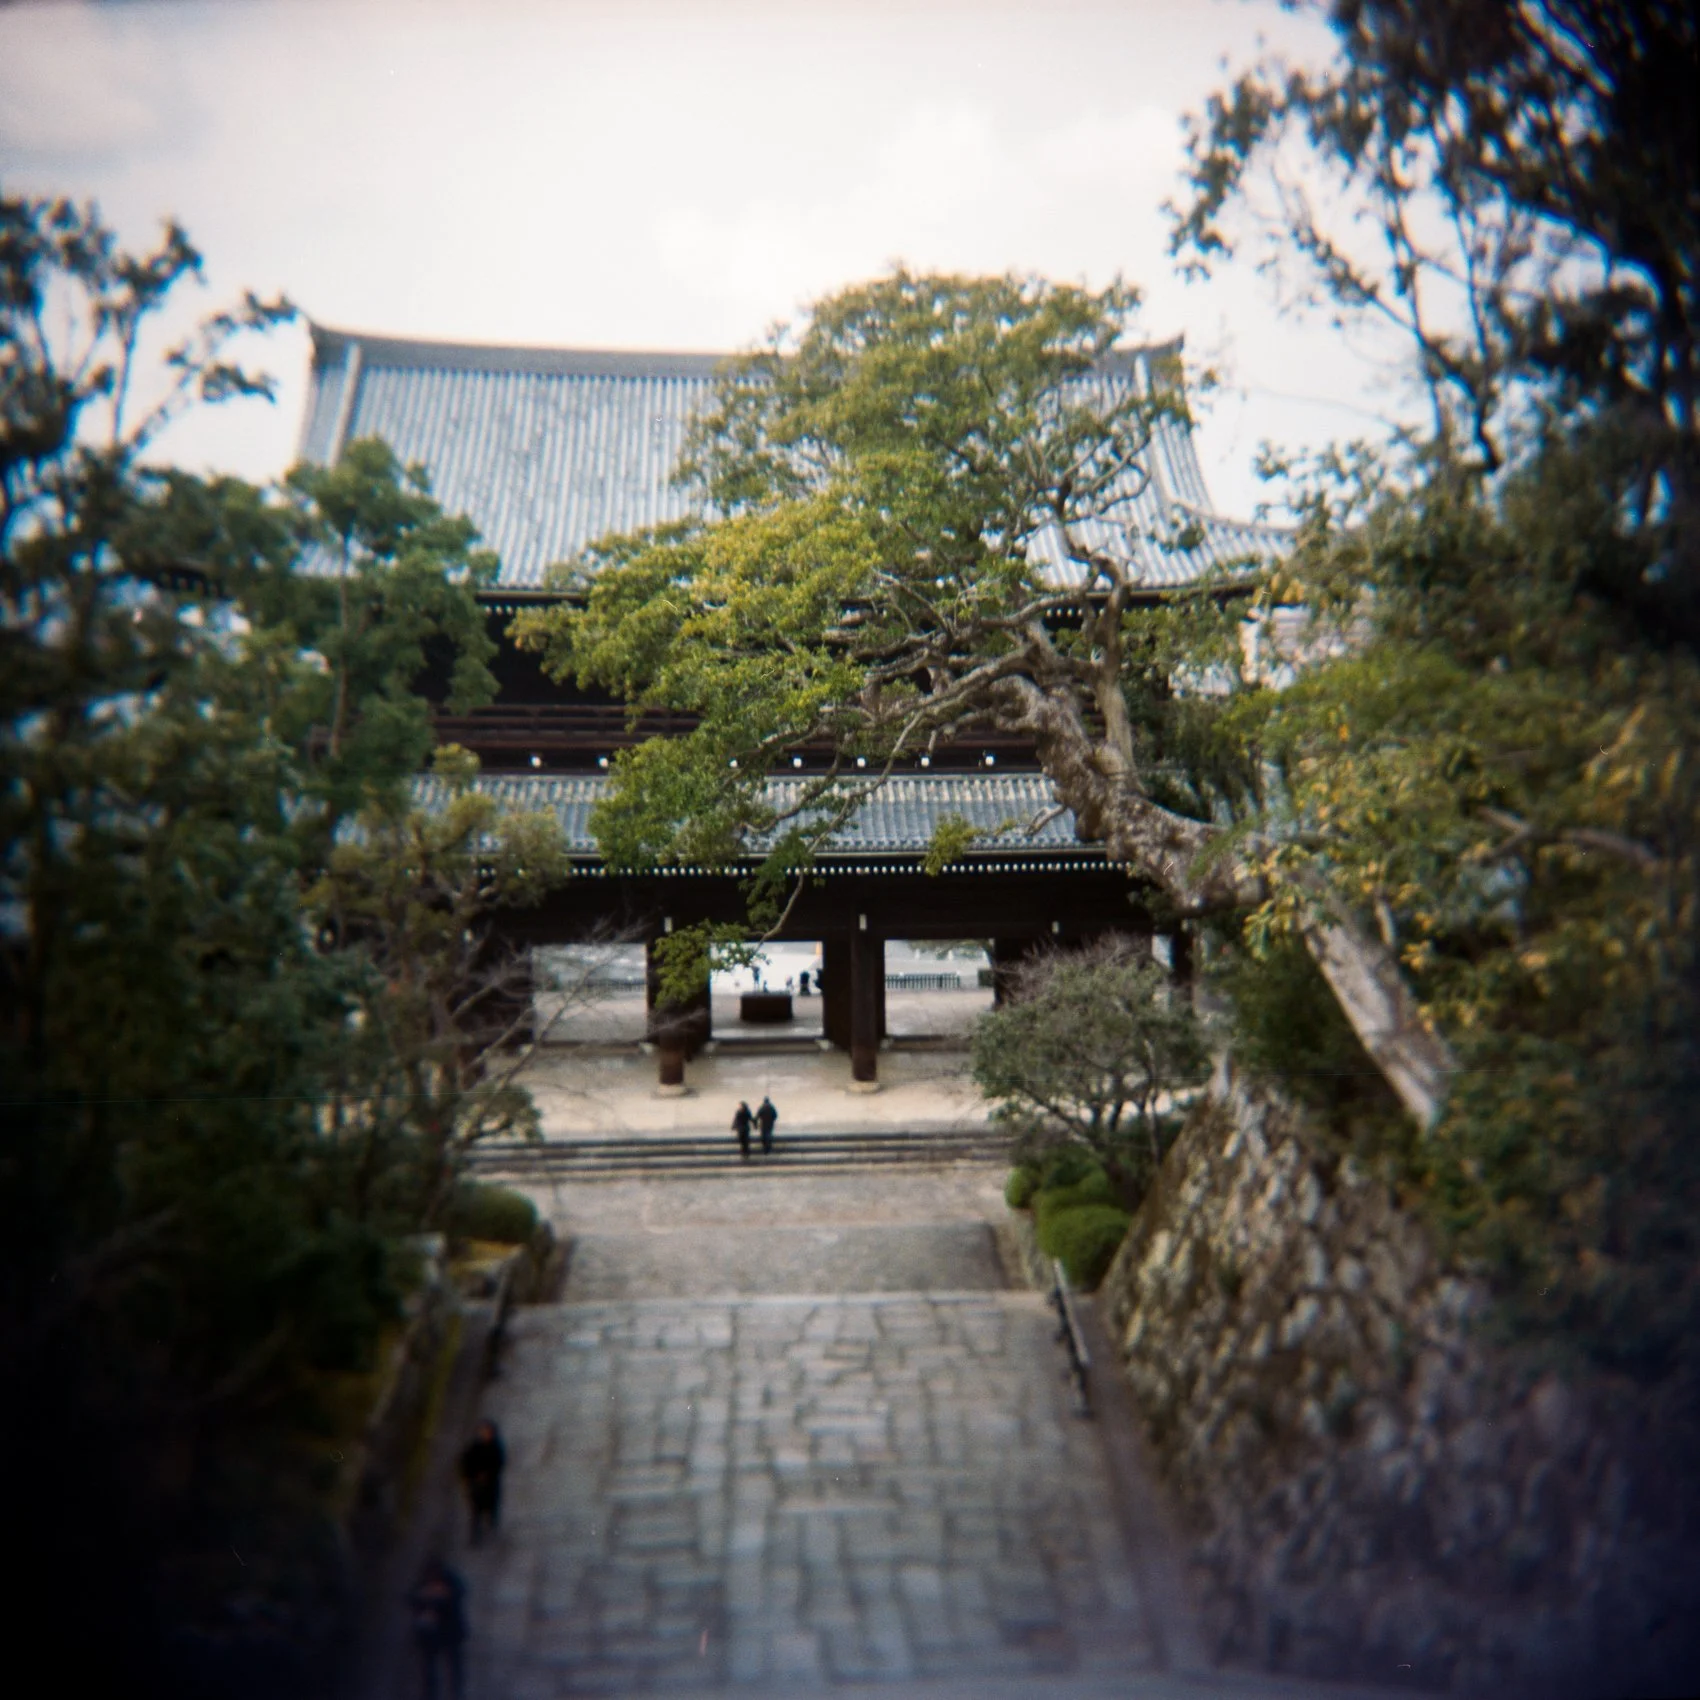
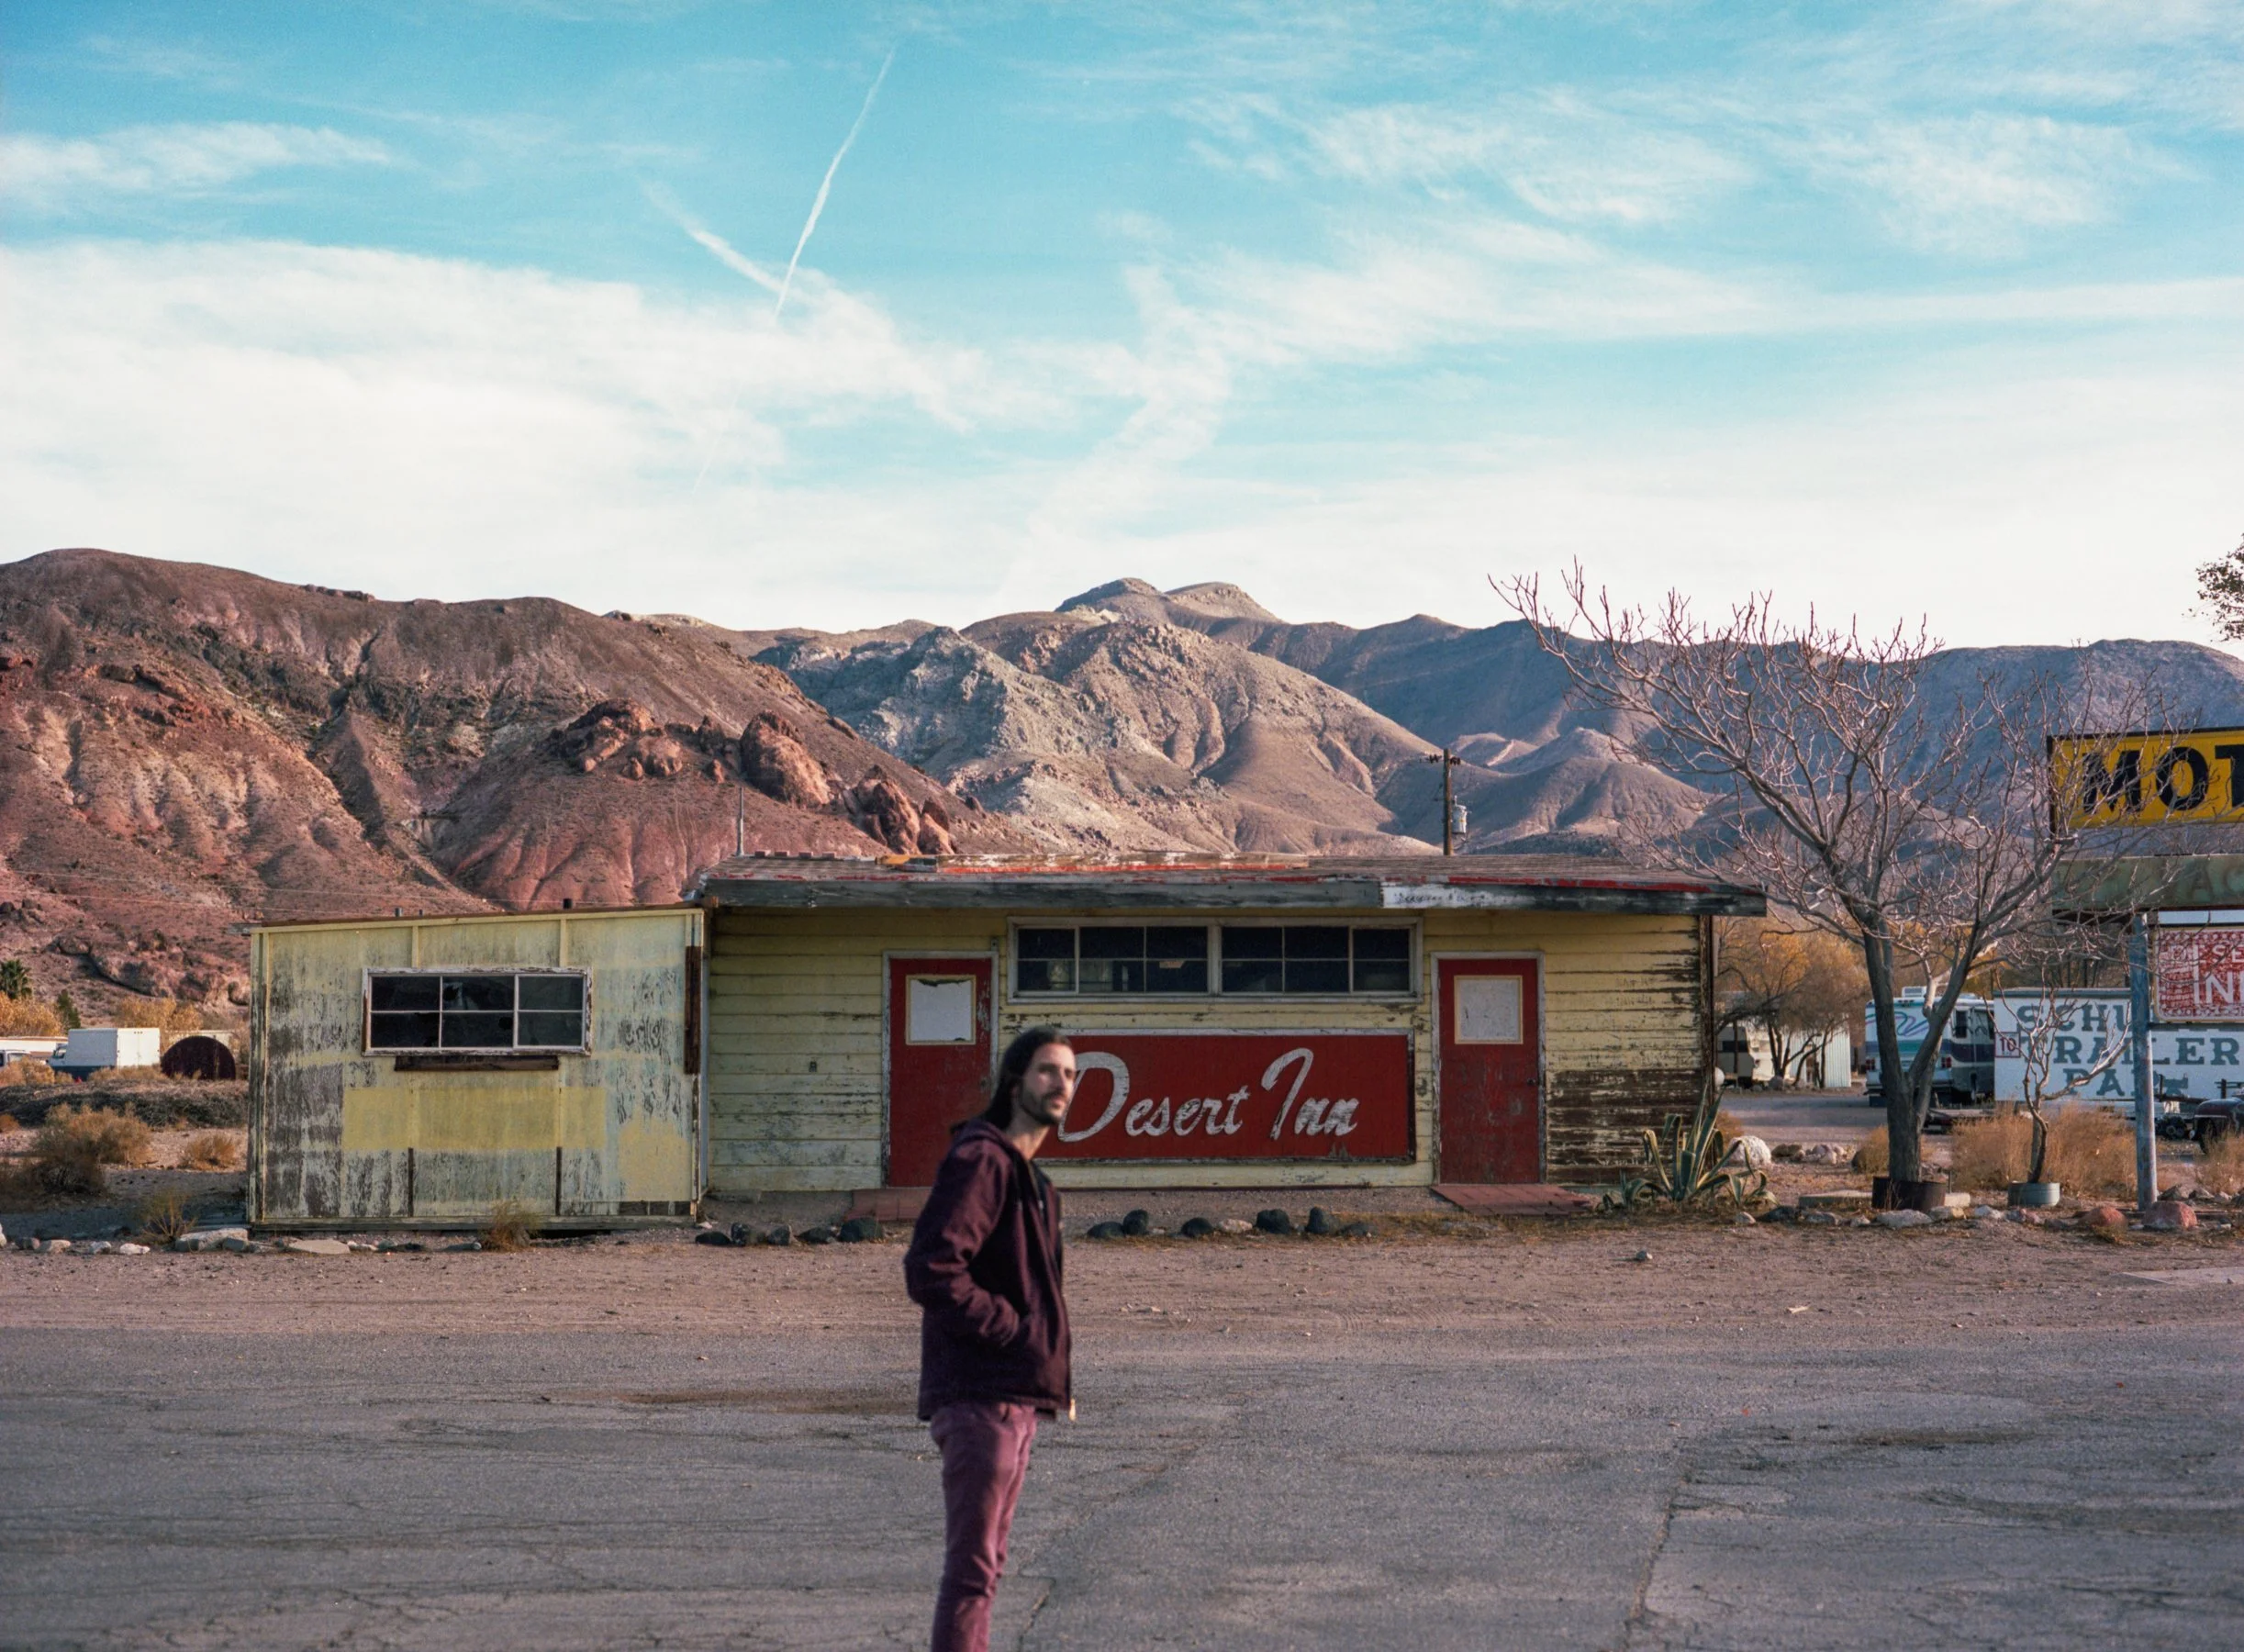
It’s on my wish list to pick up another Mamiya 645AF at some point, just because I’d like to have it back in my collection. Before I sold it, I took it with me on a cross country road trip and I still dream about the photos I took with it. We witnessed a sunrise over the Grand Canyon, the vastness of the Hoover Dam, and the empty, movie-like landscapes across the southwestern United States. I’ve included all of my favorite photographs from that trip below so you can decide if this camera is for you! I used Kodak Portra 160 and Kodak Portra 400 film for these photos, along with the 80 mm f/2.8 lens, which is the standard lens that most people use with it. I tend to shoot with the aperture wide open when I can, which gives me that dreamy, cinematic feel that I love. But, as you will notice in some of the images, sometimes the focusing up close just wasn’t quite right. I think there was an issue with my particular camera though, because I would have trouble with the autofocus and end up just manually focusing my images. That was another reason I sold mine, but I’m hoping if I pick up another one, that it won’t have that issue!

I also love that it is super easy to take multiple exposures with the Mamiya 645AF. I found it much easier to create multiple exposures with the Mamiya than the Contax. It’s easy to forgot that you have the multiple exposure setting on with the Contax, leaving you with triple or quadruple exposures every once in a while! The Mamiya multiple exposure function was nice because you can pre-set the number of images you want to take and that way, you won’t end up shooting more than you’d planned for. I’ve included a few examples of multiple exposures with the Mamiya below!

If you’re thinking of diving into medium format photography, the Mamiya 645AF is a great place to start. The Mamiya will make you fall in love with medium format photography. It’s also nice that it’s relatively affordable (around $1500-$2000), at least compared to the Contax 645 (around $3000-5000)! The Pentax 645 is also a popular medium format camera that runs quite a bit cheaper (around $700-1000) than the Mamiya 645AF and the Contax 645, but I don’t have any personal experience with that one. I’ve heard it’s great though and is on my list to try out in the future! If you’ve never shot with 120 film before, I’d recommend starting out with a Holga GCFN or Diana F+, which are toy cameras that are much more affordable (anywhere from $60-150). The Holga is my favorite camera in the world, and the one camera I never leave home without! You can read my full review with tons of sample photos on my blog here, or watch my YouTube video!

If you’re on the hunt for a pro level medium format camera though, here’s where you can find the Mamiya 645AF or the Contax 645. There are a few different models for the Mamiya 645, but I had the 645AF model. The AFD models are a bit more modern and have the potential to use a digital back, which could save you lots of money on film. However, I’m a film girlie through and through so I like to shoot with it the old-fashioned way. But the digital back would be a great place to start and could save you some money while you’re learning the functionalities of the camera. :)

WHERE TO BUY THE MAMIYA 645

KEH Camera

Etsy

eBay

MAMIYA 80MM F/2.8 AUTOFOCUS LENS

KEH Camera

eBay

Etsy

WHERE TO BUY THE CONTAX 645

KEH Camera

eBay

Etsy

WHERE TO BUY THE PENTAX 645

KEH Camera

Etsy

eBay

Amazon

FILM RECOMMENDATIONS

Kodak Portra 160 120 film

Lomography 400 120 film

Kodak Gold 200 120 film

Neopan Across 100 Black & White 120 Film

If you found this post helpful or inspiring, I’d love it if you considered signing up for my Patreon! For as little as $1 a month, you’ll get early access to all of my YouTube videos, plus tons of photos that I don’t post anywhere else. Depending on which tier you choose, you could also receive seasonal prints and/or discounts! I always use all of the proceeds towards cameras, film & processing.

If you have any questions, I’m always happy to help! You can contact me here, or leave a comment below! Thanks so much for stopping by! You can also check out my B&H Photo storefront & Amazon Storefront for more camera/film recommendations. :) Have a magical day!

<3 Myles Katherine

(click to enlarge images)

(By using the links and/or codes in this blog post it supports Myles Katherine Photography. We may get a small kick back by you doing so.)

The Best 120 Film Stocks and Where to Buy Them | My Top 5 Favorite 120 Film Brands

At this point, I’ve tried quite a few 120 film stocks and there are definitely a handful of them that I consistently return to. I’m also always on the hunt to save money where I can, so I try to balance quality and price when possible. I wanted to share my Top 5 Favorite 120 Film Brands and where to find them. To be honest, there aren’t really that many 120 films out there, unfortunately. Lomography, a company that promotes and sells cameras and film, has been doing what it can to keep 120 film alive. They have so many interesting experimental films and cameras, and are consistently creating new film stocks and quirky, creative cameras. I actually teamed up with them recently to help support their fight to keep 120 film alive! You can check out my YouTube video featuring Lomography’s Turquoise 120 film here! And while I love Lomography dearly, there are a few other film stocks I tend to stick with as well that balance sharpness, consistency, and pricepoint.

Ok, now let’s get into my top recommendations for 120 film!

1. Kodak Portra 160 or 400 Film

(By using the affiliate links and/or codes in this blog post it supports Myles Katherine Photography. We may get a small kick back by you doing so.)

Kodak Portra is one of the best 120 film stocks out there. While it is the priciest on my list, it is also the most consistent and most accuratate in terms of skin tone, color balance, and clarity. The images I get with Kodak Portra 160 and 400 are always sharp, beautiful, and natural. I would say Kodak Portra is the closest to reality you will find in any 120 film stock. By this I mean, the colors beautifully mimic real life and you will end up with photos that are a stunning representation of your subject. When I’m shooting weddings, I prefer to use Kodak Portra because it has smooth skin tones, which is great for portraits, and it isn’t too weird or unusual in a way that will confuse my client. As creative as I like to get with my photography, I also want my client to be happy. I usually always have a few rolls of Kodak Portra in my fridge at all times. If you’re unsure whether Kodak Portra 160, 400, or 800 is for you, I’ll explain a little deeper. I recommend Portra 160 if you’re shooting in a super bright environment or in direct sunlight. If you’re at the beach, or in a bright field, 160 is the way to go. If it’s cloudy outside, I’d choose 400. If it’s overcast and you’re in the shade or shooting indoors, I’d recommend Kodak Portra 800. I didn’t include Portra 800 in my recommended list though because it is EXPENSIVE. I order it every once in a while and I absolutely love it, especially when shooting with the Holga 120 camera, but most of the time I simply don’t have the money to spend on it.

WHERE TO BUY

Kodak Portra 160

Amazon

B&H Photo Video

Adorama

Kodak Portra 400

Amazon

B&H Photo Video

Adorama

Kodak Portra 800

B&H Photo Video

Adorama

2. Kodak Gold 200 Film

Kodak Gold 200 is probably the film stock I use the most. It’s super affordable and has that sharp crispness that Kodak film is known for. It has a beautiful golden glow to it that is perfect for days at the beach or on vacation. I take it with me every time I travel because I love that vintage golden glow. It creates sort of a nostalgia and old timey-ness (is that a word??) that reminds me of photographs from my childhood. I try to convince myself to try out other films when I’m placing an order, but it’s really hard to beat the price and the quality on this one. I use it with my Holga pretty often too, but I try to make sure I have a lot of sunlight when using it, just because at 200 ISO, it won’t be able to capture as much detail in the shadows as a 400 ISO film. I do love it so much though and recommend it for beginner 120 film shooters because of the awesome price.

WHERE TO BUY

B&H Photo Video

Adorama

3. Lomography Color Negative 100 or 400 Film

I love Lomography’s Color Negative film so much. It’s affordable, has bright, vibrant colors, and is consistent. When I’m doing a fashion shoot or trying to capture the vivid colors of a landscape, this is a great film to use. If Kodak Portra mimics the colors in reality, Lomography Color Negative takes it up a notch. Sometimes, I have to bring down the colors in this film when scanning my images. But I’d rather have to bring it down that add saturation to my images. This is a film I always have on hand too. The Color Negative 400 is the one I’ll grab as I run out the door if I’m not sure of what environment I’m going to be shooting in. It can be difficult to get your hands on sometimes, as they sell out often, but they always restock eventually so just keep checking back. Lomography is a somewhat small company so I think it’s hard for them to keep up with the demand sometimes. That’s why I always buy in bulk when I find it for a good price on Amazon or eBay. Every once in a while I order direct from their website too, but oftentimes, I can find a better deal elsewhere. They also have an 800 ISO version too, but again, 800 film can be pricey. Sometimes, I can’t justify spending that much money on film I’m going to use in my Holga because at most, I’ll only get 12-16 shots out of it. Again, use the 100 ISO film in bright, direct sunlight, and the 400 ISO film for cloudier days or for use in the shade. :)

WHERE TO BUY

Lomography Color Negative 100

Amazon

Lomography Color Negative 400

B&H Photo Video

Adorama

Lomography Color Negative 800

B&H Photo Video

4. Neopan Acros 100 II Black and White Film

Neopan Acros is super special to me because it’s one of the first film stocks I ever used. It reminds me of when I first became obsessed with film photography and was shooting exclusively in black and white. The original version of the film has been discontinued unfortunately, but the new version is (almost) just as good. It’s one of the sharpest film stocks out there, in my opinion. And for a 100 ISO film, the shadows carry quite a bit of detail. Still, I’d recommend shooting this film in bright lighting conditions. Even on a cloudy day, you might get some unwanted graininess in the shadows. Personally, I love the moodiness that this film has. It’s great for printing in the darkroom because of it’s tonal range. These days. I always gravitate towards color film first because I like to have the option of color or black and white in post-processing. A part of me wants to get back into black and white though, because there is something so special about a true black and white photograph.

WHERE TO BUY

Amazon

B&H Photo Video

Adorama

5. Kodak T-MAX 400 Black and White Film

Kodak T-Max 400 probably one of the most affordable black and white 120 films out there. But, once again, Kodak’s quality and pricepoint is hard to beat. I don’t shoot black and white as often as I used to, but if you're a new film photography, black and white is typically cheaper in general versus color film. But I like to shoot in color and then convert to black and white in post-production if I feel the need. I just like to have the option. But if you’re new to 120 film, especially if you’re trying out a Holga or Diana F+ for the first time, cheaper is better, because I promise you, your first few rolls are going to be rough. It just doesn’t make sense to spend a bunch of money on images that will likely not turn out the way you want them to. As I always say though, don’t give up! You can also read more about the Holga here and Diana F+ here if you are interested in toy cameras. They are super affordable and great for beginners wanting to try out 120 film. They also create insanely unique images and will get you excited about film photography. Just have patience, and most importantly, have FUN!

WHERE TO BUY

B&H Photo Video

Adorama

Bonus Recommendations:

Cinestill 400D if willing to spend the cash. It’s cinematic, great in low light, and perfect for cameras like the Nikon FE2 or Canon AE-1 and you want to enhance the magic of incredible 35 mm cameras like those.

Ektar 100 if shooting only in bright daylight for vibrant colors. One of my favorite photographers, Wendy Laurel, uses Ektar 100 pretty exclusively. But she lives in Hawaii and is always in bright, colorful daylight. It works perfectly for her work, but doesn’t always work for photographers like me who live in places like Virginia with inconsistent weather.

Neopan Acros 100 (the original version), if you can find it. You can read my blog post all about this film, or check out my YouTube video comparing version one of this film to version two.

Kodak Tri-X and Ilford HP5 are also great black and white options if you’re having trouble finding T-Max, they’re just a little more expensive.


If you found this post helpful or inspiring, I’d love it if you considered signing up for my Patreon! For as little as $1 a month, you’ll get early access to all of my YouTube videos, plus tons of photos that I don’t post anywhere else. Depending on which tier you choose, you could also receive seasonal prints and/or discounts! I always use all of the proceeds towards cameras, film & processing.

If you have any questions, I’m always happy to help! You can contact me here, or leave a comment below! Thanks so much for stopping by! You can also check out my B&H Photo storefront & Amazon Storefront for more camera/film recommendations. :) Have a magical day!

<3 Myles Katherine

15 Must-see Photo Locations in Japan | Tokyo, Kyoto, Hakone, Nara, & Kamakura from a Photographer's Perspective

(By using the affiliate links and/or codes in this blog post it supports Myles Katherine Photography. We may get a small kick back by you doing so.)

I still dream about my trip to Japan daily. It was such a magical, memorable, beautiful country. It surprised me in so many different ways. I remember everything vividly too, probably because it was unlike any other country I’ve visited. It was as though Japan was my long lost sister. I felt so comfortable there, like I was meant to be there all along. The food was incredible. The people were insanely kind and generous. The sites and experiences we had were entirely unique. It was just… perfect. I miss it every day!

I took some of my favorite photographs during my trip to Japan and I wanted to share 15 Must-See Photo Locations that you absolutely cannot pass up while you’re there. Our trip was 11 days long, which allowed us to visit Tokyo, Kyoto, Hakone, Nara and Kamakura. We squeezed a lot into our trip but it truly never felt rushed somehow. I’m hoping to put together a travel guide for Japan soon to help you out with planning if you’re interested in traveling there! The Shinkansen bullet train from Tokyo to Kyoto made it extremely easy to travel between those two cities. And the trains between the smaller cities were surprisingly easy to navigate too. We booked the JR (Japan Rail) Pass, which allows you to choose a railway pass based on how long you’re planning on staying in Japan. You could also book a super cheap flight between Tokyo & Kyoto if you prefer flying!

1. Sensō-ji Temple - Tokyo

The Sensō-ji Temple is the oldest temple in Tokyo, and also one of the most beautiful. We actually stayed in the Asakusa district so the Sensō-ji Temple wasn’t too far of a walk for us. There are many different beautiful structures to look at when visiting the temple and tons of delicious street food and shops around it. You could spend a whole day over here taking photos, eating food, shopping, and exploring Asakusa. It’s a lovely, quiet part of Tokyo. One of the reasons we decided to stay in Asakusa was to be close to this temple. And also because I typically try to stay somewhere that is a little off the beaten path. If we go back to Tokyo, I will definitely stay in Asakusa again. You can easily access any other part of the city by metro. The hotel we stayed in doesn’t exist anymore, unfortunately, but if I were to go again, the OTHER SPACE Asakusa Hotel is typically the kind of place we’d choose. We are budget travelers but we also like to stay in places that are clean, highly rated, and close to various sites. :) Honestly, every single hotel and hostel we stayed in during our trip to Japan was exceptionally clean, lovely, and safe. I slept like a baby on our trip!

You can check out my YouTube video about our day exploring the temple Sensō-ji Temple here!

2. Fushimi Inari Shrine (Kyoto)

The Fushimi Inari Shrine is a truly magical place. It is a shinto shrine dedicated to the Inari god and known for its paths of thousands of bright red gates. The messengers for the Inari god are thought to be foxes, which is why you will see fox masks for sale along the path to the Inari shrine. I was lucky enough to go during the off-season (mid-February) so there weren’t too many tourists. I’ve heard the shrine can get incredibly crowded, but just make sure you get there bright and early, or head further down the path before taking your photos. There are lots of different paths and directions so you can easily find a corner to hang out in that isn’t filled with people. If you’re up for a challenge, you can hike to the top of the shrine. It’s about 2.5 miles to the top. We hiked part of the way up to see a view of the city, but decided to save our energy for exploring Kyoto for the rest of the day. I took tons of photos here. Even on a slow day, I had to be patient and wait for other tourists to pass before taking photos, but it was absolutely worth it. You could book an early morning tour like this one to avoid crowds and if you’d prefer to be guided, as I will say it was a bit of an adventure getting to the Shrine from the center of Kyoto.

Check out my YouTube video about our visit to the Fushimi Inari Shrine here!

3. Owakudani Mountain (Hakone)

Owakudani Mountain is a perfect spot to get a clear view of Mount Fuji. Some people might opt for a Mount Fuji specific tour like this one to get a closer view of the mountain, but I was content with the view that I got from Owakudani mountain. We were extremely lucky to have a clear view that day! Owakudani is an active volcanic valley with beautiful views of Hakone. You might have heard of this place before because it’s known for it’s black eggs. They boil eggs right there in the natural spring water of the mountain. Apparently, you will have 7 years of good luck if you eat one of the eggs! I ate two for good measure, but maybe they cancelled each other out? I’d stick with just one next time. :) There is also a super cute tourist center at the top of the mountain and we ate one of the most delicious curry buns from our entire trip right there at the tourist center. Honestly, Owakudani Mountain was one of the most memorable parts of our trip. If you’re staying in Hakone, you absolutely need to stop by here for an hour at least! We rented a car, which made getting around super easy. The roads weren’t crowded at all and the landscape was stunning. I’d definitely rent a car again if we went back! You can check out some rental car options here.

Watch our YouTube video about our day on Owakudani Mountain here!

4. Robot Restaurant (Tokyo)

I’m sure you’ve heard of this one. The Robot Restaurant is known around the world for its incredible performances, insane interior design, and overall quirky and enjoyable entertainment. It’s a dinner show filled with music, dance, monsters, ninjas, drums, robots, and anything else you can think of. I’ve heard some people say the show is overrated, but my husband and I thoroughly enjoyed ourselves, Personally, I’d recommend eating dinner elsewhere beforehand because the food and drink options are limited. I just remember my husband and I glancing back and forth at each other throughout the whole show because everything happening was so insane. We’ve already decided to go back there again next time we’re in Tokyo. Before the show, we stopped by the famous Cat Cafe that Katy Perry visited in her documentary, and that was another epic highlight of the night. There is truly no shortage of entertainment in Tokyo!

You can catch a glimpse of the Robot Restauarant in my YouTube video here!

5. Onshi Hakone Park (Hakone)

One of the reasons I was most excited to visit Japan was to go to the gardens and see some of the beautiful plants and flowers that Japan is known for. While we were a bit early in the season for cherry blossoms, I still greatly enjoyed every aspect of the Japanese gardens we explored. Onshi Hakone park is located on the edge of Lake Ashi, a stunning crater lake that offers boat rides and sightseeing cruises for views of Mount Fuji. Looking back, I wish we had taken the Pirate cruise, just to catch a glimpse of Mount Fuji again and to see a bit more of the lake. But we wandered around Onshi Hakone Park for hours and walked away feeling relaxed and in touch with nature. As usual, I took a million photographs. There is an amazing view of the lake from the top of the park too! You could also choose to take a tour like this one, that includes a boat ride on Lake Ashi and a visit to Owakudani Mountain that I mentioned above!


You could spend a whole day at the lake if you’d like, there is plenty to do around the lake, from shrines, to museums, to aquariums, to gardens, to boat rides. It’s a lovely place to visit if you’re looking for a day of serenity. As I mentioned, I would recommend booking a rental car if you’re staying in Hakone. We booked our rental car in Odawara after taking the train there from Nara. We kept the car for a few days and traveled to Kamakura and then dropped it off at the Tokyo airport on our way back home. I’m planning to put together a full itinerary from our trip to Japan soon, so make sure to check back!

Watch our YouTube video about our day in Hakone here!

6. Hakone Open-Air Museum

I remember my time in Hakone as being extremely peaceful and reflective. I had been looking forward to visiting the Hakone Open-Air Museum since we’d started planning our trip, so I was bummed when it turned out that the weather was dreary that day. But for some reason, wandering around in the open-air museum in the rain was even better than I could have imagined. The museum was empty except for a few random tourists, but we had practically the whole museum to ourselves. It was oddly meditative and calming. We stuck our feet in the hot spring water foot bath and looked out over the sculpture garden. We meandered through at a pace that didn’t feel rushed and we thoroughly enjoyed all of the art and sculptures. I’m always on the hunt for sculpture gardens when I visit new cities. As an artist, I always leave feeling inspired and interested in the world and the people around me. While we were in Hakone, we stayed at the Irori Guesthouse Tenmaku, which was incredibly stunning and inspiring too.

Watch our YouTube video about our day in Hakone here!

7. Nara Park

If you google Nara, Japan, the first thing you will see is a park filled with wild free-roaming deer being fed little round cookies by tourists. And that’s exactly what it is. On the edges of Nara park, you’ll find street vendors selling “deer cookies”. There are crunchy wafers that the deer will follow you around for. I’m not gonna lie, some of the deer would get a little aggressive for a cookie, but we had a blast feeding the deer and took so many photos. It was a strange and exciting experience. I live in Virginia, so I’m used to seeing deer every day. But getting this close to them and having them not be afraid of me, was a new experience. It was super silly and a fun way to start the day on the way to visit the Tōdai-ji Temple. I’d recommend booking a tour like this one that includes a walk through the park, as well as entrance into the temple.

You can check out our YouTube video about our day in Nara here!

8. Tōdai-ji Temple (Nara)

The Tōdai-ji Temple is the main temple that Nara is known for. It is one of the oldest wooden structures in the world and is a UNESCO world heritage site. It difficult to capture it’s grandness in a photograph, but it’s a stunning place and house s a giant Great Buddha statue. It’s a bit of a hike to get to the Temple, but because of that, there are beautiful views of Nara next to the temple. This was one of my husband’s favorite places we visited on our trip, because he was obsessed with how old the temple was - it was constructed in 752! The fact that that is even a year that existed, blow my mind. If you don’t want to walk all day through Nara, you could try this bike tour of the city! I’d definitely recommend this if you've already been walking around Tokyo or Kyoto for a few days.

You can check out our YouTube video about our day in Nara here!

9. Chion-in Temple (Kyoto)

There isn’t a single spot in Kyoto that I didn’t want to photograph. Kyoto is an incredibly beautiful city. I also found it peaceful, calming, and filled with nature and beauty. The Chion-in Temple Sammon was right outside of our hotel, The Kyoto Hana Hotel, so we couldn’t help but explore it. There were so many picturesque buildings and meditative corners. We spent hours looking at the architecture and taking in the history. As a photographer, I was in heaven in terms of photo locations. There weren’t many tourists so I had practically the whole place to myself to take photos and fully capture every building, wall, garden and staircase.

You can check out our visit to the Chion-in Temple in our YouTube video here!

10. Gion District (Kyoto)

One of the most magical moments of my life happened in the Gion district of Kyoto. You can read my book, Temporary Beauty, to find out exactly what that was! :) The Gion district is known as the “geisha district”, where you’ll find lantern-lit streets, traditional teahouses, historic wooden buildings, winding alleys, and delicious authentic food. It feels like stepping into another world. If you’re in Kyoto, you absolutely need to wander through this area and take in the true culture of Kyoto. One of the things I loved most about Japan was that you could wander aimlessly and never run out of things to see or do. There is never a lack of food or snacks or street vendors to try out. We like to joke that we basically just had a “food vacation” because we ate everything we could find. They even have vending machines on the street filled with hot coffee and hot green tea! Obsessed. We stayed in the Kyoto Inn Gion The Second and loved it. The breakfast was ridiculously cute and we had such a lovely time in the Gion district.

You can watch our YouTube videos about our time in Kyoto here or here!

11. Kyoto Gyoen National Garden

We actually stumbled upon this garden on the way to Honke Owariya, the oldest noodle house in Kyoto, Japan, founded in 1465! All of the noodles are made in-house and it is known specifically for their soba noodles. We had a bit of time to kill before we were hungry for our lunch at Honke Owariya, so we looked at the map and saw this giant park, the Kyoto Gyoen National Garden, which we discovered was Kyoto’s national garden. We ran into a few early blossoming cherry blossoms trees which absolutely thrilled me. It was a gorgeous place to meander through and as a photographer, it was the perfect off-the-beaten path location to snap some photos. It’s a huge park with plenty to see, including the stunning Kyoto Imperial Palace, known for it’s gorgeous architecture, gardens, and long history. This tour includes a visit to the Imperial Palace if you’re interested in having a guided tour of Kyoto.

You can watch our YouTube video about Honke Owariya and the Kyoto Gyoen National Garden here!

12. Kotoku-in Buddhist Temple (Kamakura)

One of my goals on our trip to Japan was to see as many giant Buddha statues as possible. The Kotoku-in Buddhist Temple is known for its giant copper Buddha statue. We ate a delicious lunch at a vegetarian restaurant called NatuDeco right outside the gates of the temple, and apparently Barack Obama had eaten there once too! It ended up being one of my favorite meals in Japan because the presentation was so beautiful and the matcha was incredible. The Kotoku-in Temple isn’t very big so you don’t need to stay there more than an hour I’d say. We wandered around some of the local neighborhood streets nearby afterwards and imagined what it would be like to live in Japan. I can’t say I’d need to revisit the Kotoku-in Buddhist Temple but I’m glad I checked it off my bucket list, and we did truly enjoy experiencing the local food and seeing the gorgeous homes and families that lived nearby. There are also walking tours of Kamakura that include other temples we didn’t get a chance to see, so if we ever make it back, I’d consider going on one just to see more!

Watch our YouTube video about our time in Kamakura here!

13. Shibuya Crossing (Tokyo)

I’m sure you’ve heard of Shibuya Crossing, also known as the Shibuya scramble. It’s a giant intersection in Tokyo where you can watch hundreds of people cross paths on their way to work in the grand city of Tokyo. To me, the Shibuya Crossing is a little overrated. I prefer less people and more nature on my travels, but it is something to cross off the bucket list if you’re visiting Tokyo. The area is a bit like the Times Square of Tokyo, but we actually found that there wasn’t that much to do in that area of Tokyo. We did eat at a delicious izakaya but we were happy to head back to our hotel in Asakusa once we were done with the big city vibes. I’d recommend finding a good spot to people watch like the Shibuya Sky deck. If I ever make it back to Shibuya, I will definitely be doing the Go-Cart tour. We saw so many people riding these Mario-Kart style go-carts through the city and it looked like so much fun!

Check out our YouTube video about our time in Tokyo here!

14. Harajuku (Tokyo)

If you’re on the hunt for good shopping and Japanese fashion and culture, Harajuku is the spot. There were tons of clothing shops, food vendors, and quirky bars. We didn’t spend as much time here as I would have liked because it was a bit crowded, but it was super fun to check out. I bought a few clothing items that I’m still obsessed with. I do remember even the metro being jam-packed with people, so next time I’ll be sure to do some research to figure out a good time to visit Harajuku when it’s not crazy busy.

You can see more of our time in the Harajuku district in our YouTube video here!

15. Kamakura Zaimokuza Beach

I’m always on the hunt for the ocean. It seemed only right to see the ocean at least once on our trip to Japan, considering Japan itself is technically an island nation! We stayed at the Kamakura Prince Hotel, and spent our day walking up and down the beach, taking photos, picking up seashells and watching surfers. It was a perfect way to end our trip to Japan. We ate a delicious dinner at Moana Makai. While I don’t remember there being a whole lot to do near the beach, it was the off-season technically so I’m sure it picks up there in the summer time. This tour includes a visit to the beach, as well as all of the other important landmarks in Kamakura.

Watch our YouTube video about our time in Kamakura here!


BONUS IDEAS:

There are so many places I didn’t get a chance to visit that are on my list for next time, like the Arashiyama Bamboo Forest, Kinkakuji Temple in Kyoto, teamLab Borderless: MORI Building Digital Art Museum, and of course, the new Studio Ghibli theme park is definitely on my bucket list. I do think we did a pretty good job seeing as much as we did in 11 days, but another trip to Japan in (hopefully) in the works for next year. Maybe I just won’t come home next time though. :)

I hope this list helped you out in some way with your planning! I can tell you one thing, you will NOT regret your trip to Japan. It was life-changing for me. I can hardly wait to go back!

RECOMMENDED TRAVEL SITES

Booking.com (hotels, rental cars, flights)

Expedia (travel packages, flights, hotels, etc.)

Viator (for booking tours)