Ricoh 500GX 35 mm Camera Review with Sample Photos in England! | The Best Compact Film Camera for Travel

(By using the affiliate links and/or codes in this blog post it supports Myles Katherine Photography. We may get a small kick back by you doing so.)

When I was planning my 16 day trip to England, where we’d be hiking 102 miles along the Cotswold Way National Trail, I knew I needed to choose my cameras very carefully. Not only would I be carrying them the entire time, but I was also potentially encountering various types of weather and lighting. I have a tendency to bring at least 6 cameras with my on my international trips, but I wanted this specific trip to challenge me to downsize. And let me tell you, it was difficult. Of course, I knew I was going to bring my Holga 120 GCFN as my medium format camera and my Canon G7X Mark II as my point and shoot digital camera, but I was having a hard time finding the ultimate 35 mm camera for this sort of adventure. That is, until I found the Ricoh 500GX.

THE STORY BEHIND MY SEARCH

I spent days researching 35 mm cameras. I made spreadsheets. I used Chat GPT like it was my job. When I’m looking for a new camera, there are always a few features I absolutely cannot live without. If you’ve been following me for a while, you know that I’m obsessed with multiple exposures. Searching for 35 mm film cameras that easily can create multiple exposures isn’t an easy task. For most people, that feature isn’t a deal breaker. But for me, on a 102 mile hike, it was absolutely a deal breaker. The other feature that was necessary for this trip was a super lightweight and small body. I didn’t want to weigh myself down and make the hike any harder than it had to be. I considered taking my Nikon FE2, one of my favorite vintage 35 mm cameras (you can read more about it on my blog here), but it was a bit too bulky to fit in my tiny camera bag I had purchased for this trip. I had also already decided which point and shoot 35 mm camera I was going to take (don’t worry, I have a full blog post coming about that camera too!) but I wanted to bring along a second 35 mm camera that was higher quality with sharper images and a better lens.

I was also working with a very specific budget. I was hoping to stay within the $200-300 range. There were plenty of cameras out there closer to $500 or $1000 that I would have loved to buy, but I’d already spent way too much money on gear for the hike. (P.S. I have a full YouTube series and downloadable PDF all about our hike, if you’re interested!)

I almost pulled the trigger on the Rollei QZ 35T but when I realized that the camera body wasn’t super durable and would not fare well in a rainstorm, it became too risky to spend that much money on a camera for this particular trip.

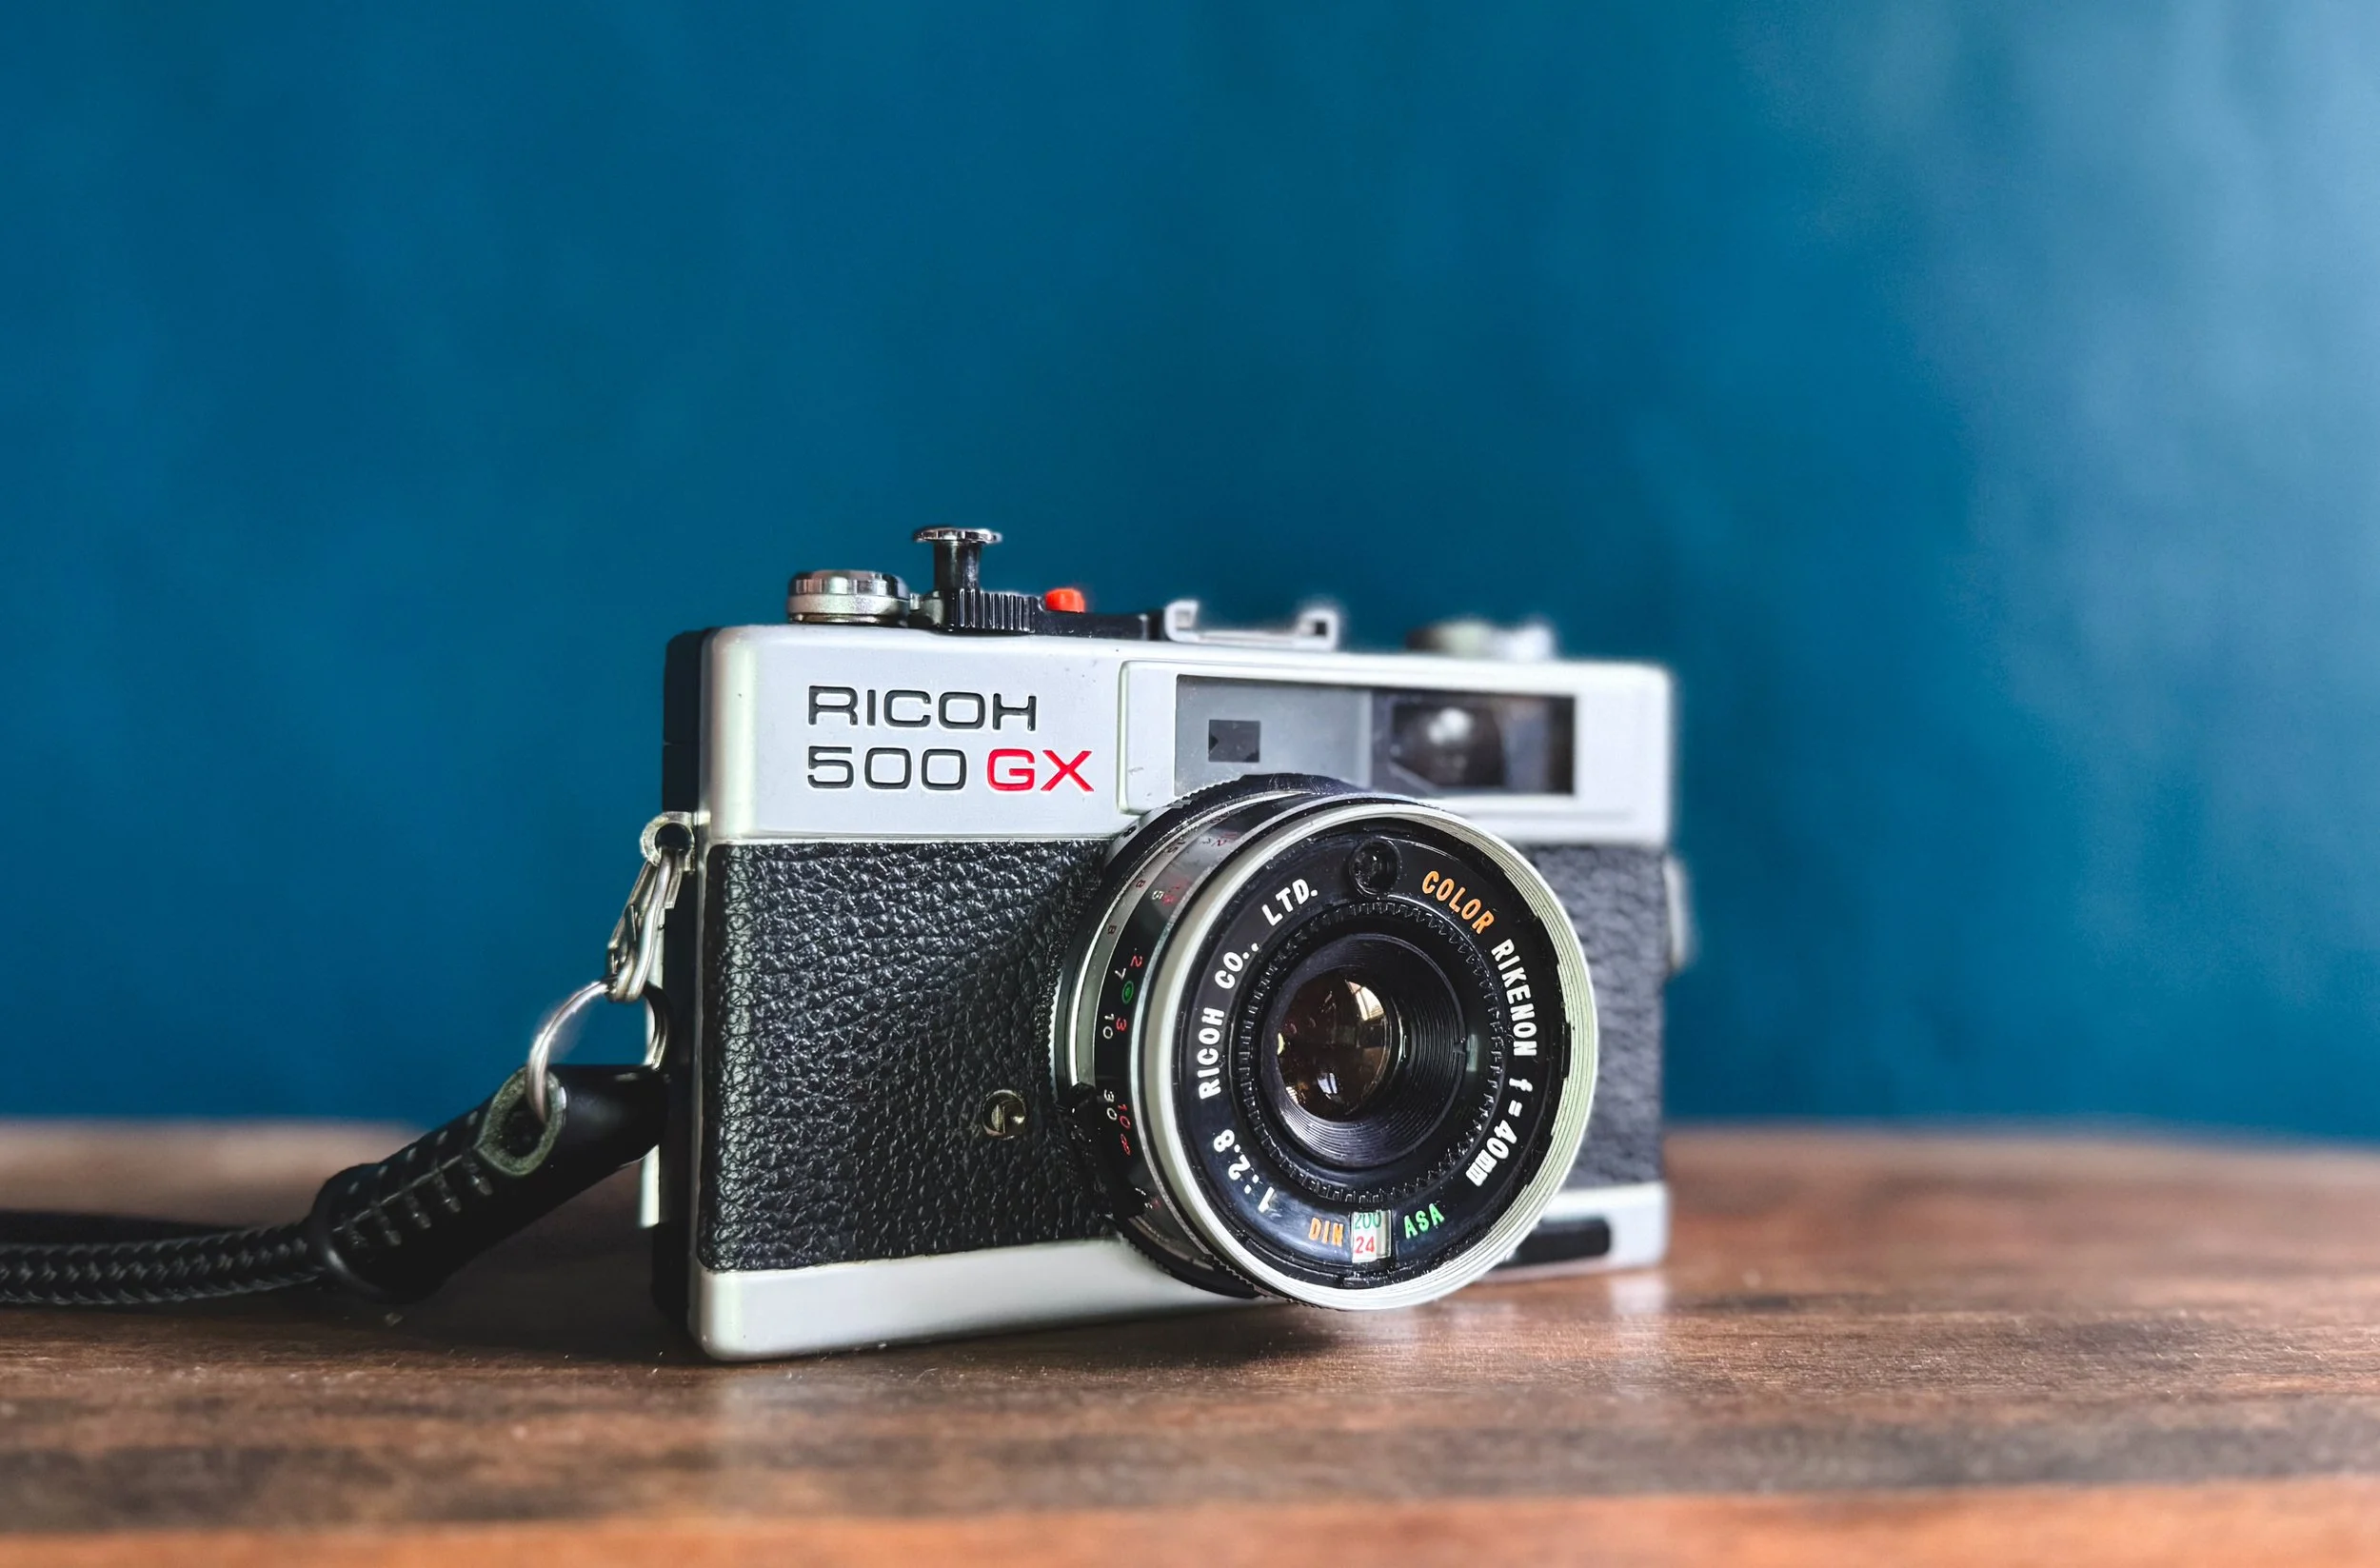
Typically, I prefer an aperture priority setting on my cameras. However, when I stumbled upon the Ricoh 500GX, it seemed to cover all of the topics I mentioned above, but it had a shutter priority setting instead. Not ideal, but still a partially automatic setting that would allow me to take photos quickly and easily. We had a lot of miles to cover every day, so I couldn’t spend the entire time fiddling with manual settings for every photo. The Ricoh 500GX was also super tiny and was known for it’s durable metal body. The original version of this camera (which also tends to be easier to find) doesn’t have a multiple exposure feature, but the Ricoh 500GX has a designated multiple exposure lever on the front of the camera. It’s also known for it’s sharp Rikenon 40 mm f/2.8 lens. The lens is built-in and non-detachable, which also helps to keep the camera small and compact.

HISTORY

The Ricoh 500GX was released around 1977 in Japan (somehow I always end up choosing Japanese cameras!) and was sold throughout the 1980s. It’s considered a compact 35 mm rangefinder camera and was one of the last styles in the 500-series line that was produced. The Ricoh brand wasn’t quite as popular as some of the bigger brands, which allowed it’s price point to stay relatively low. But that’s precisely why it’s a great camera. You get high quality for a low price.

WHY THE RICOH 500GX IS SPECIAL

Not only is it good value for the price, it also offers a few smaller features that most 35 mm cameras didn’t offer at the time. Some of these might seem like minor conveniences, but they truly make a difference. The Ricoh 500GX has a battery check light, a shutter lock (to help prevent the shutter from firing accidentally), a bulb setting for long exposures, a tripod mount, a film-loading indicator, a shutter indicator, and a “coupled” rangefinder focusing system. A coupled rangefinder allows for more precise focusing because the focus ring is mechanically linked to the actual rangefinder system. It can take some patience to get used to manual focus, particularly when it comes to a rangefinder, but this is a great camera to learn manual focus and get comfortable with it. Just as an FYI, the 500GX takes a PX675 mercury battery that is not made anymore. You do not need a battery to use the camera, but it will make the light meter work. The shutter priority setting does not fully function either without a battery, though I seemed to manage just fine in the Cotswolds without a battery in the camera. A modern replacement of the PX675 battery would be a PR44 battery.

All of these features are on top of the shutter priority, compact and durable metal body, sharp f/2.8 lens, and the multiple exposure lever that comes with the 500GX model. It’s a perfect blend between a point and shoot camera and a larger, more professional SLR camera.

HOW TO CREATE MULTIPLE EXPOSURES

I’m so glad I did a test roll before bringing it with me on my trip, because I quickly discovered that my multiple exposure knob was completely stuck and wasn’t functioning at all. My husband and I spent an entire day trying to loosen it. We tried rubbing alcohol, goo gone, grease, everything. The joys of vintage cameras! I swear, someone must have glued the knob in the closed position. I’m not surprised though, because if you’re not a fan of multiple exposures and the setting annoys you, I can see someone getting sick of it and gluing it shut. In order to use the multiple exposure setting, you have to first twist a small circular lock knob into the green, “open” position. This will free the multiple exposure lever, which you then slide into the direction of the arrow until you feel it stop. This has re-cocked the shutter and you can take another photo. Just make sure not to wind the advance lever until you’ve taken your second exposure. In my case, we were able to slowly move the circular knob into the open position (with a LOT of pressure), but it is permanently stuck there. So, essentially, my camera is always primed for the multiple exposure setting. In a fully functioning 500GX, the circular knob would automatically switch back to the red, “closed” position after you’ve taken your second image. I don’t really understand why Ricoh felt the need to make it a two-step process, but I’m just glad that I was able to get mine working!

FINAL THOUGHTS

Looking back on my trip, I don’t think I could have found a more perfect 35 mm camera. While the camera was actually a bit heavier than I’d anticipated, it’s because the body is incredibly sturdy and rugged, ideal for a hike with unpredicatable weather and rugged hillsides. On the flip side, it was much smaller and more compact than I expected, which I absolutely love, of course. I was able to bring 4 cameras with me that somehow magically fit inside my tiny camera bag. I posted a full YouTube video about the various cameras I brought with me. You can watch it on my channel here!

I also just think the camera itself is so beautiful and classic. The black and silver styling, the cute tiny lens, the sharp edges. It’s one of my favorite cameras to look at, that’s for sure. Not to mention, the satisfying click that you get with those vintage 35 mm cameras every time the shutter releases. There’s just nothing like it!

I know with 100% certainty that this camera will be going with me on many more trips. Because it’s so compact, there’s really no excuse for not bringing it with me everywhere! I dropped it into a field of cow manure on our trip and it came out without a scratch! I have a tendency to drop my cameras, so the fact that it is such a sturdy little thing is a major plus for me. And while I’m not as comfortable with shutter priority as I am with aperture priority, I got used to it quickly and I was able to get the images I wanted with some thoughtful planning. I could rave about this camera all day because it really is amazing for the price. I truly think this one flies under the radar so make sure to snatch one up as soon as possible! I’ve included tons of sample photos below from our trip so make sure to browse through to help you decide if this camera is for you!

WHERE TO FIND THE RICOH 500GX OR RICOH 500G

RICOH 500GX

Etsy

eBay

RICOH 500G & 500 (no multiple exposure option, but easier to find)

Etsy

eBay

KEH Camera

RECOMMENDED FILM STOCK

Kodak Portra 400 35 mm

Amazon

B&H Photo

Kodak Portra 160 35 mm

Amazon

B&H Photo

Kodak Gold 200

Amazon

B&H Photo

Lomography Color Negative 400

Amazon

B&H Photo

Ilford HP5 Black and White

Amazon

B&H Photo

You can read more about my favorite color 35 mm film stocks here or my favorite black and white film stocks here!

If you found this post helpful or inspiring, I’d love it if you considered signing up for my Patreon! For as little as $1 a month, you’ll get early access to all of my YouTube videos, plus tons of photos that I don’t post anywhere else. Depending on which tier you choose, you could also receive seasonal prints and/or discounts! I always use all of the proceeds towards cameras, film & processing.

If you have any questions, I’m always happy to help! You can contact me here, or leave a comment below! Thanks so much for stopping by! You can also check out my B&H Photo storefront & Amazon Storefront for more camera/film recommendations. :) Have a magical day!

<3 Myles Katherine

(By using the affiliate links and/or codes in this blog post it supports Myles Katherine Photography. We may get a small kick back by you doing so.)

Minolta AF Tele 35 mm Camera Review with Kodak UltraMax 400 Sample Photos in San Diego, California

(By using the affiliate links and/or codes in this blog post it supports Myles Katherine Photography. We may get a small kick back by you doing so.)

When I stumbled across the Minolta AF Tele in an antique shop and noticed it was fully functioning, I knew I’d found a gem. I’m always on the hunt for vintage point-and-shoot cameras because they are great for traveling and because they each have their own character and vibe when it comes to the photos. I have another 35 mm Minolta camera, the Minolta Maxxum STsi, which is one of my all-time favorite 35 mm cameras. You can read my full review of that camera here! Before the Minolta Maxxum STsi, I’d never had any experience with Minolta cameras, but I’m started to learn that they are definitely a standout when it comes to vintage cameras.

I decided to take the Minolta AF Tele with me on a recent trip to San Diego and I’m obsessed with how the images turned out. Not only was it incredibly easy to use, the photographs also have the perfect retro film vibe that I wanted for my California photos.

HISTORY

The Minolta AF Tele was originally produced in the late 1980s to early 1990s and was created as an accessible camera for beginners and professionals alike. The specific model of the camera featured in this blog post was manufactured in Japan. You can check the bottom of the camera for an imprint to see where yours was produced! The Minolta brand, in general, is a Japanese company, though some of the Minolta cameras are manufactured in other countries as well. I’ve learned over the years that if I see that a camera was produced in Japan, it’s usually a slam dunk. They also typically have a nice aesthetic design and seemingly last forever.

Point-and-shoot cameras really started to gain traction in the 1980s so it was a bit of a competition between all of the major camera companies to produce amazing compact film cameras that were easy to use for the average consumer. The Minolta AF Tele was one of those cameras, though maybe not quite as popular as cameras like the Canon Sure Shot ( I’m still on the hunt for one of these). I find it to be unique and interesting and I definitely never plan to give mine up!

FEATURES

The standout feature of this camera is it’s dual lens system. While it is a compact camera, the lens has two different focal lengths that you can easily switch between. There is a 35 mm f/2.8 lens and a 60 mm f/4.3 telephoto lens. There are other versions of this camera, like the Minolta AF Tele Super, that have slightly different lens options built into the camera.

The Minolta AF Tele also has a built-in flash, a fill-flash button, a self-timer, auto advance, auto rewind, and a tripod mount. This camera is fully autofocus, so there is no need to worry about taking the time to manually focus. However, this also means there are really no manual features at all, so you’re a bit limited when it comes to creativity.

There is also no option for multiple exposures. There is a film rewind button on the bottom of the camera, but it rewinds the film roll all the way back to the beginning, so you will be shooting over your entire roll. While you can still overlap images in this way, it gives you way less control than a camera with a dedicated multiple exposure feature.

The fill-flash button is also a nice addition to the camera, especially if you are shooting with a subject that is back-lit. The main flash will automatically come on when the camera senses there is not enough light, but it’s nice to have the option to turn the fill-flash on when needed.

The camera will automatically set the ISO for your film as well, as long as the film is DX coded, which most films are.

It takes a Lithium CR-P2 battery or two AA batteries, which is a very interesting feature I’ve never seen before in a camera. But it’s definitely nice for those moments when your battery dies on you while traveling and AA batteries are the only ones you can find.

And obviously, one of the best things about these point-and-shoot cameras is that they are compact and easy to travel with! While the Minolta AF Tele is a bit more bulky that other cameras of its class, it is still a nice, small size compared to 35 mm cameras with detachable lenses and zoom lenses.

FINAL THOUGHTS

I’m kind of obsessed with this camera. The dual lens system is just plain fun to experiment with and gives you that little bit of extra zoom when you’re traveling if you see something farther away that you’d like to photograph. I’m also pleasantly surprised by the sharpness of the lens, especially at the 35 mm setting. It seems a little softer when using the 60 mm lens option. I’m a little bit bummed that there is no multiple exposure option, but I usually assume this is the case with most point-and-shoot cameras from that time period. It’s a rare feature that most people didn’t care for, particularly the average, everyday consumer. This camera is somewhat limited in terms of creativity, considering it doesn’t have any manual features other than the fill-flash, but it’s still a super fun point-and-shoot that is great for capturing candid moments with friends and family, and for traveling with a 35 mm film camera that doesn’t weigh a million pounds or take up a ton of space in your bag.

This is definitely one of those cameras I’ll just quickly grab when I’m running out the door for a family day or a night out with friends. I’m sure it will be joining me on many more trips in the future too. If you see this one out in the wild, snatch it up! I got lucky and found mine for $20, but it seems that the average going rate is about $25 to $70. I’d pick one of these up sooner rather than later if I were you, because these vintage point-and-shoots just keep getting more and more popular!

For these photos, I used Kodak UltraMax 400 35 mm film, but if you’d like more film recommendations, make sure to check out my blog post, The Best Color Film for 35 mm Cameras!

WHERE TO BUY THE MINOLTA AF TELE 35MM CAMERA

eBay

Etsy

Amazon

KEH Camera

If you found this post helpful or inspiring, I’d love it if you considered signing up for my Patreon! For as little as $1 a month, you’ll get early access to all of my YouTube videos, plus tons of photos that I don’t post anywhere else. Depending on which tier you choose, you could also receive seasonal prints and/or discounts! I always use all of the proceeds towards cameras, film & processing.

If you have any questions, I’m always happy to help! You can contact me here, or leave a comment below! Thanks so much for stopping by! You can also check out my B&H Photo storefront & Amazon Storefront for more camera/film recommendations. :) Have a magical day!

<3 Myles Katherine

SAMPLE PHOTOS


And of course, I have to share all of my favorite photos from my trip to San Diego with you!!!

Canon AE-1 Program Sample Photos in Hallstatt, Austria | The Perfect 35 mm Travel Camera

(By using the affiliate links and/or codes in this blog post it supports Myles Katherine Photography. We may get a small kick back by you doing so.)

Hello everyone!

I am Myles Katherine's sister, Natalie Anne, and I'm excited to share a bit about my journey with film cameras with you! Myles has inspired me, as she has my entire life, to be more creative, thoughtful, and curious about the world. Photography is her passion and is the instrument she uses to embrace everything in life. I have always admired her skills and thus have been remarkably intimidated to pick up film photography on my own. When I told her I wanted to bring a film camera with me for my work deployment to Europe for four months, she knew just the one and by golly it's now one of my favorite possessions!

The Canon AE-1 Program is timeless, durable, and takes impressively sharp shots. While it is a bit weighty, this adds to its charm. There is something so satisfying about snapping a photo and pulling its winding arm. It can take some getting used to focusing, especially for close-ups and portraits, as it does not have autofocus. But, once you get the hang of it, the photographs are so sharp and beautiful. And even the ones that turn out a little soft are dreamy and special in their own right. Plus, isn’t that the fun of film photography?

Myles also thought this camera would be a good idea for me because it has a full auto mode. The original version of this camera, the Canon AE-1, does not have this feature. So if you’re looking for a camera that is a bit more user-friendly for beginners, the Canon AE-1 Program is the way to go. And if you’d like to delve into more advanced modes, like shutter priority or full manual, you have that option with this camera as well. The best part about it is that you get that professional film camera vibe without the complication, so it’s the perfect 35 mm travel camera! Not to mention, it has that classic black and silver vintage 35 mm camera look, so it looks cute even sitting on a shelf when it’s not being used.

For the lens, I use the standard Canon FD 50 mm f/1.8 lens. This seems to be the one most people gravitate towards for this camera. It’s affordable, small, and sharp!

One of my first tests with this camera was bringing it for a weekend trip to Vienna and Hallstatt, Austria. Hallstatt has been on my bucket list for quite some time. It was actually the inspiration for Arendelle (Frozen fans, anyone?!) and it feels so magical.

I took this Hallstatt Day Tour from Vienna, via Viator, and it was the perfect introduction to this beautiful corner of the world. I couldn't recommend this tour enough! If you want to read my full review of this tour, you can find it on our travel blog, C’est Le Brie, here!

I went on this bus tour solo and felt comfortable the entire time. It was a longer bus ride, with beautiful scenery throughout the Salzkammergut region. We had time to explore Hallstatt on our own where I grabbed a Frankfurter and fries for lunch, wandered the town, went up the tram to the Hallstatt Viewing Platform, and took a short boat ride. Most importantly, my Canon AE-1 Program was loaded with film and ready to go. I took some of my favorite shots on this excursion, and was so happy my sister had recommended this camera to me. She had heard great things about it, but I think we have both been so impressed with the results. I even think she's a little jealous she doesn't have one yet!

Below are all the photos I took in Hallstatt using Kodak Gold 200 and Kodak Ultra Max 400 35mm film. If you're interested in purchasing a Canon AE-1 Program, you won't regret it! I know without a doubt that I’m going to treasure these images forever.

-Natalie Anne

P.S. Make sure to check out our travel blog, C’est Le Brie, here! We share all of our travel adventures, tour reviews, hotel and restaurant recommendations, photos, and even recipes! And don’t forget to watch our YouTube video about the Canon AE-1 Program here!

WHERE TO BUY THE CANON AE-1 PROGRAM

Amazon

Etsy

KEH Camera

eBay